
One way to decorate many of our wood products is by decoupaging - adhering pretty paper, fabric, napkins, etc., with a decoupage medium to the wood piece. Mod-Podge - an all-in-one glue, sealer, and finish created in 1967 - is the most widely known decoupage medium and comes in several finishes, such as gloss, matt, and satin.
Decoupaging is fun and easy and can transform a plain piece of wood into a thing of beauty. There are several decoupaging methods. Which one is best depends on your preference and the project.
Here are three decoupaging methods:
Simple Method:

Step 1: Gather your supplies: wood (we’re using scrap wood), whatever you are adhering to the wood (we’re using scrapbook paper), a pencil, scissors, decoupaging medium (we’re using Mod-Podge matte), and a brush (we’re using a foam brush).

Step 2: Cut whatever you want to adhere to the wood to the shape of the wood. I find it’s best to cut it a little larger than the actual piece and trim and/or sand the excess off once everything is dry. If you decide to cut it to the exact size and shape, make sure you 1) cut it perfectly and 2) line everything up perfectly before adhering it to the wood.

Step 3: Apply a coat of decoupaging medium to the piece of wood. The thicker the material you’re attaching, the thicker the coat of decoupaging medium should be. For example, use a thin layer for napkins and a thicker layer for fabric.

Step 4: Place whatever you want to adhere to the wood on top of the wood. Try to Gently press out any bubbles with a balled-up piece of plastic wrap. Don’t use your fingers because you can mess up the paper. You can also use a brayer to gently roll out the bubbles.
Step 5: Let the piece completely dry before trimming or embellishing further.
NOTE: There may be bubbles that don’t want to come out. Thankfully, those bubbles often disappear when it dries.
Iron-On Method:

Step 1: Gather your supplies: wood, whatever you are adhering to the wood, a pencil, scissors, decoupaging medium, a brush, parchment paper, and an iron (we’re using a crafting iron, but you can use a regular iron).
Step 2: Same as above.
Step 3: Apply a coat of decoupaging medium to the piece of wood, and let it dry. It should only take a few minutes, but if you’re impatient, you can use a heat gun to dry it quicker. Just be careful, and don’t hold the heat gun too close. For thicker materials, you may want to apply a second very thin coat after the first one dries, allowing the second coat to dry as well.
Step 4: Once the Mod-Podge is dry, place the piece of paper (or other material) onto the wood exactly where you want it (you won’t be able to move it once you get started). Then put a piece of parchment paper on top of that. Use an ironing board or pad underneath if you care about your work surface (I have a worktable that’s already pretty beat up, so I didn’t use one).

Step 5: Using an iron at the highest temperature with NO steam, gently press down on the parchment paper, being careful not to move the paper you are adhering to the wood. Keep the iron pressed down (not moving it) on a section of the project for about five seconds, then move it a little and press it down for about five seconds again until you’ve covered the entire surface. Gently lift the parchment paper (careful as it may be hot) to ensure it’s adhering. Go over it again one or two times, using the five-second and move technique until it is firmly attached.
NOTE: This is probably my favorite method because I’ve never had any bubbles or creases using this method. However, you do need to be patient and allow the decoupaging medium to dry, it only works on flat surfaces, AND because you’re using a hot iron, it probably isn’t the best choice if you’re working with children.
Plastic Wrap Method:

Step 1: Gather your supplies: wood, whatever you are adhering to the wood, a pencil, scissors, decoupaging medium, a brush, parchment paper, an iron (My craft iron doesn’t get hot enough, so I have to use a regular iron – despite what is in the photo), and plastic wrap.
Step 2: Same as above.

Step 3: Cut a piece of plastic wrap slightly larger than the piece you’re working on. Then, layer the wood, plastic wrap, and paper (or whatever material you’re attaching) exactly where you want it (you won’t be able to move it once you get started) with the parchment paper on top. Again, if you don’t want to damage your work surface, use an ironing board or pad
Step 4: Using an iron at the highest temperature with NO steam, gently press down on the parchment paper, being careful not to move the paper you are adhering to the wood. Keep the iron pressed down (not moving it) on a section of the project for about five seconds, then move it a little and press it down for about five seconds again until you’ve covered the whole piece. Gently lift the parchment paper (careful as it may be hot) to ensure it’s adhering. Go over it again a few times, using the five-second and move technique until it is firmly attached.
NOTE: This is my least favorite method because it seems to take longer, and you really need a HOT iron for it to work. However, there is no waiting time, but again probably not the best method when working with children.
Finished pieces:
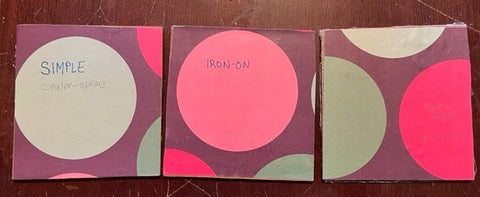
Simple Iron-On Plastic Wrap
Spray Sealer Decoupaging Medium Sealer No Sealer
FINAL NOTE:
The wood should be prepped before you start decoupaging. Sand it, wipe it clean, and paint it if you want to. Also, once it’s dry, you need to seal the piece. You can use another thin (the thinner, the better) layer of Mod-Podge, but I find that sometimes causes it to wrinkle and form bubbles, and I don’t like seeing the brush strokes (See image at left). I prefer using a clear poly coat spray.
Thank you for reading our blog! If you have gotten this far please use code BLOGJULY for a 10% discount on your next order!